一个基本的threejs应用
此笔记记录于DISCOVER three.js,大多数为其中的摘要,少数为笔者自己的理解
目录介绍
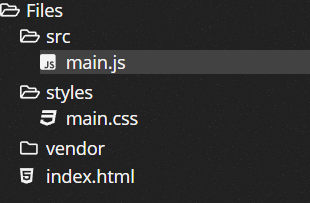
vendor为下载的threejs文件
index.html
<!DOCTYPE html>
<html>

<head>
  <title>Discoverthreejs.com - Your First Scene</title>

  <meta name="viewport" content="width=device-width, initial-scale=1">
  <meta charset="UTF-8" />

  <link rel="icon" href="https://discoverthreejs.com/favicon.ico" type="image/x-icon">

  <link href="./styles/main.css" rel="stylesheet" type="text/css">

  <script type="module" src="./src/main.js"></script>
</head>

<body>
  <h1>Discoverthreejs.com - Your First Scene</h1>

  <div id="scene-container">
    <!-- Our <canvas> will be inserted here -->
  </div>
</body>

</html>
main.css
body {
  /* remove margins and scroll bars */
  margin: 0;
  overflow: hidden;

  /* style text */
  text-align: center;
  font-size: 12px;
  font-family: Sans-Serif;

  /* color text */
  color: #444;
}

h1 {
  /* position the heading */
  position: absolute;
  width: 100%;

  /* make sure that the heading is drawn on top */
  z-index: 1;
}

#scene-container {
  /* tell our scene container to take up the full page */
  position: absolute;
  width: 100%;
  height: 100%;

  /*
    Set the container's background color to the same as the scene's
    background to prevent flashing on load
  */
  background-color: skyblue;
}
关键的main.js
import {
  BoxBufferGeometry,
  Color,
  Mesh,
  MeshBasicMaterial,
  PerspectiveCamera,
  Scene,
  WebGLRenderer,
} from 'three';

// Get a reference to the container element that will hold our scene
const container = document.querySelector('#scene-container');

// create a Scene
const scene = new Scene();

// Set the background color
scene.background = new Color('skyblue');

// Create a camera
const fov = 35; // AKA Field of View
const aspect = container.clientWidth / container.clientHeight;
const near = 0.1; // the near clipping plane
const far = 100; // the far clipping plane

const camera = new PerspectiveCamera(fov, aspect, near, far);

// every object is initially created at ( 0, 0, 0 )
// move the camera back so we can view the scene
camera.position.set(0, 0, 10);

// create a geometry
const geometry = new BoxBufferGeometry(2, 2, 2);

// create a default (white) Basic material
const material = new MeshBasicMaterial();

// create a Mesh containing the geometry and material
const cube = new Mesh(geometry, material);

// add the mesh to the scene
scene.add(cube);

// create the renderer
const renderer = new WebGLRenderer();

// next, set the renderer to the same size as our container element
renderer.setSize(container.clientWidth, container.clientHeight);

// finally, set the pixel ratio so that our scene will look good on HiDPI displays
renderer.setPixelRatio(window.devicePixelRatio);

// add the automatically created <canvas> element to the page
container.append(renderer.domElement);

// render, or 'create a still image', of the scene
renderer.render(scene, camera);
渲染过程如下:

Scene
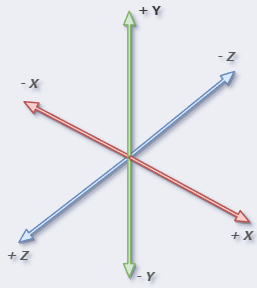
场景是我们能看到的一切的载体。您可以将其视为所有 3D 对象都存在于其中的“小宇宙”。使用之前提到的笛卡尔坐标系
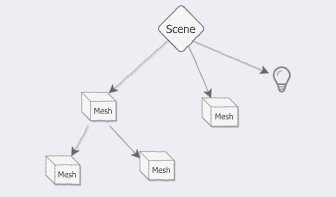
当我们将对象添加到场景中时,它们会被放入 场景图中,这是一个树形结构,场景位于顶部。
Camera
PerspectiveCamera:透视投影,它旨在匹配我们的眼睛看待世界的方式OrthographicCamera:正交投影,果您曾经研究过工程图或蓝图,您可能会熟悉这种类型的投影,它对于创建 2D 场景或覆盖 3D 场景的用户界面很有用。
类似于一个点光源,一个太阳光源(直射光)
其中PerspectiveCamera的参数介绍如下:
fov,或视野:相机的视野有多宽,以度为单位。aspect,或纵横比:场景的宽度与高度的比率。near, 或近剪裁平面:任何比这更靠近相机的东西都是不可见的。far,或远剪裁平面:任何比这更远离相机的东西都是不可见的。
这四个参数一起用于创建一个有边界的空间区域,我们称之为 视锥体。
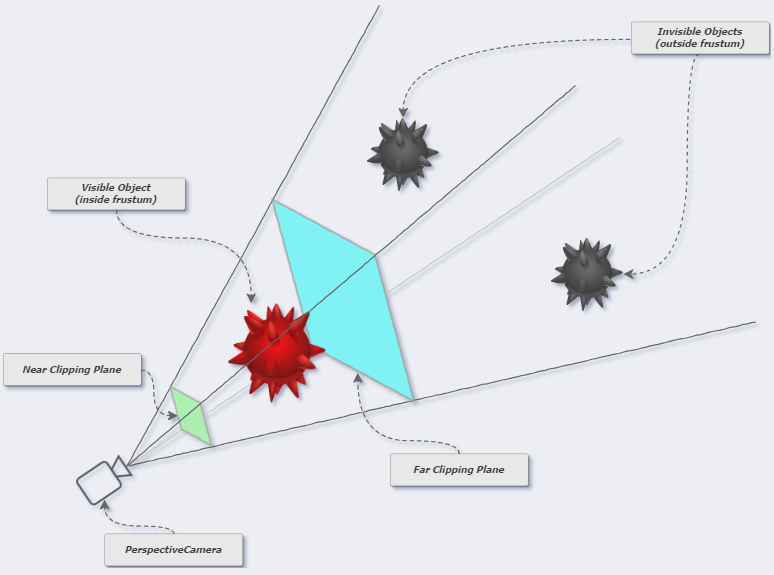
渲染器不会绘制场景中不在平截头体内的任何对象。如果一个物体部分在平截头体体内部,部分在平截头体外部,则外部的部分将被切掉(剪掉)。
Renderer
如果场景是一个小宇宙,而相机是一个指向那个宇宙的望远镜,那么渲染器就是一个艺术家,他通过望远镜观察并将他们看到的东西 非常快 的绘制到一个<canvas>中去。 我们把这个过程叫做渲染,得到的图片就是一个渲染效果图。
我们需要使用容器的宽度和高度告诉渲染器我们的场景大小。
// next, set the renderer to the same size as our container element
renderer.setSize(container.clientWidth, container.clientHeight);还需要告诉渲染器设备屏幕的像素比是多少。这是防止 HiDPI 显示器模糊所必需的 (也称为视网膜显示器)。
// finally, set the pixel ratio so that our scene will look good on HiDPI displays
renderer.setPixelRatio(window.devicePixelRatio);
Mesh
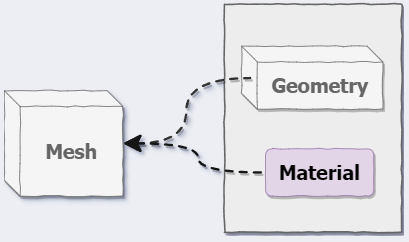
网格是 3D 计算机图形学中最常见的可见对象,用于显示各种 3D 对象——猫、狗、人类、树木、建筑物、花卉和山脉都可以使用网格来表示。
它由几何体(形状)+材质(外观)构成
在这里,我们将创建一个
MeshBasicMaterial,这是可用的最简单(也是最快)的材料类型。此材质还会忽略场景中的任何灯光,并根据材质的颜色和其他设置为网格着色(阴影),这非常棒,因为我们还没有添加任何灯光。我们将在不向构造函数传递任何参数的情况下创建材质,因此我们将获得默认的白色材质。
抗锯齿
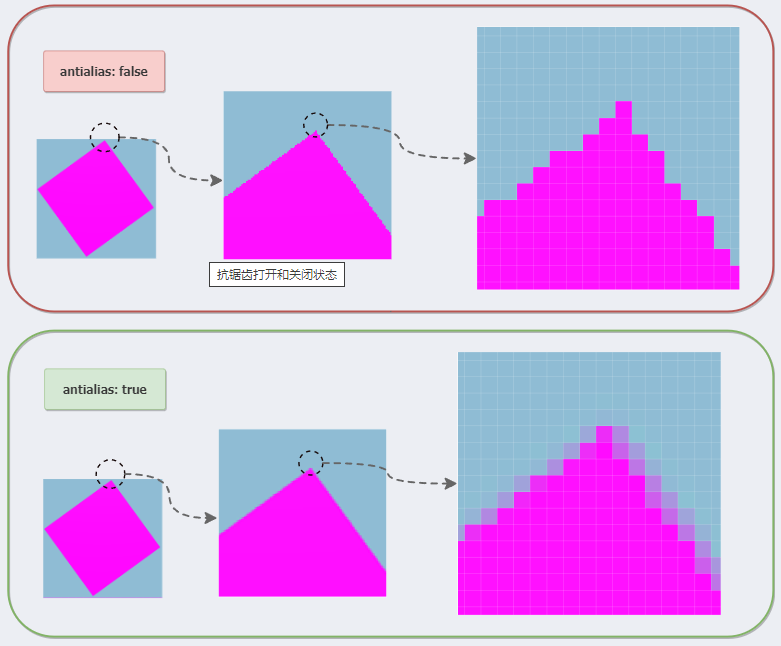
const renderer = new WebGLRenderer({ antialias: true });请注意,一旦创建了渲染器,就无法更改此设置。要更改它,您需要创建一个全新的渲染器。不过,这几乎不是问题,因为您会希望在大多数场景中都使用它。
抗锯齿是使用内置的WebGL方法执行的,即 多重采样抗锯齿 (MSAA)。
模块化上述内容
目录介绍
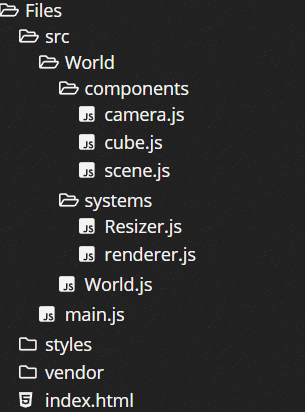
我们将这些模块分为两类:组件components和系统systems。组件是可以放置到场景中的任何东西,例如立方体、相机和场景本身,而系统是在组件或其他系统上运行的东西。
main.js
应该隐藏与 实现 世界应用程序不相关的所有内容。在 main.js 中,我们应该无法访问场景、相机、渲染器或立方体。如果我们以后需要添加额外的功能,我们将通过扩展接口来实现,而 不是 通过向外界公开 three.js 函数来实现。
import { World } from './World/World.js';

function main() {
  // Get a reference to the container element
  const container = document.querySelector('#scene-container');

  // 1. Create an instance of the World app
  const world = new World(container);

  // 2. Render the scene
  world.render();
}

main();
World.js
这里是一个类文件夹,所以首字母大写
import { Resizer } from './systems/Resizer.js';

let scene;
let camera;
let renderer;

class World {
  constructor(container) {
    camera = createCamera();
    scene = createScene();
    renderer = createRenderer();
    container.append(renderer.domElement);

    const cube = createCube();
    const light = createLights();

    scene.add(cube, light);

    const resizer = new Resizer(container, camera, renderer);
    resizer.onResize = () => {
      this.render();
    };
  }

  render() {
    // draw a single frame
    renderer.render(scene, camera);
  }
}

export { World };
camera.js
import { PerspectiveCamera } from 'three';

function createCamera() {
  const camera = new PerspectiveCamera(
    35, // fov = Field Of View
    1, // aspect ratio (dummy value)
    0.1, // near clipping plane
    100, // far clipping plane
  );

  // move the camera back so we can view the scene
  camera.position.set(0, 0, 10);

  return camera;
}

export { createCamera };这次我们使用了一个虚拟值1作为纵横比,因为它依赖于container的尺寸。我们想避免不必要地传递东西,所以我们将推迟设置纵横比,直到后面我们创建Resizer系统。
cube.js
import { BoxBufferGeometry, Mesh, MeshBasicMaterial } from 'three';

function createCube() {
  // create a geometry
  const geometry = new BoxBufferGeometry(2, 2, 2);

  // create a default (white) Basic material
  const material = new MeshBasicMaterial();

  // create a Mesh containing the geometry and material
  const cube = new Mesh(geometry, material);

  return cube;
}

export { createCube };
scene.js
import { Color, Scene } from 'three';

function createScene() {
  const scene = new Scene();

  scene.background = new Color('skyblue');

  return scene;
}

export { createScene };
Resizer.js
这里是一个类文件夹,所以首字母大写
const setSize = (container, camera, renderer) => {
  camera.aspect = container.clientWidth / container.clientHeight;
  camera.updateProjectionMatrix();

  renderer.setSize(container.clientWidth, container.clientHeight);
  renderer.setPixelRatio(window.devicePixelRatio);
};

class Resizer {
  constructor(container, camera, renderer) {
    // set initial size on load
    setSize(container, camera, renderer);

    window.addEventListener('resize', () => {
      // set the size again if a resize occurs
      setSize(container, camera, renderer);
      // perform any custom actions
      this.onResize();
    });
  }

  onResize() {}
}

export { Resizer };
相机使用纵横比以及视野以及近远裁剪平面来计算它的 视锥。平截头体不会自动重新计算,因此当我们更改存储在camera.aspect、camera.fov、camera.near和camera.far中的任何这些设置时,我们还需要更新平截头体。
// update the camera's frustum
camera.updateProjectionMatrix();
renderer.js
import { WebGLRenderer } from 'three';

function createRenderer() {
  const renderer = new WebGLRenderer({ antialias: true });

  renderer.physicallyCorrectLights = true;

  return renderer;
}

export { createRenderer };